7.30.2009

Vegan Brownies

Remember when there used to be a sense of regularity in my posting? I think summer laziness and regular life-ness seems to have kicked in.

We've hit some semblence of summer here in southeastern MA. Which means temps in the high 70s/low 80s with a bajillion percent humidity. And that for nearly every day there's a chance of "isolated thunderstorms". Jim Cantore, you're my favorite Weather Channel meterologist, but, really, I could use some change.

Speaking of change, what started out towards the end of last month as a general aversion to meat has evolved into a more vegetarian diet. Which both family and most of my friends think I'm crazy for. LOL What a big difference between CA and MA, right?

I found this recipe over at Vegetarian Times' website. I've made various vegan cupcakes before, but had yet to work with tofu. The recipe came together very quickly, which is good as I started making it 30 minutes before leaving to go see HP6 (again lol).

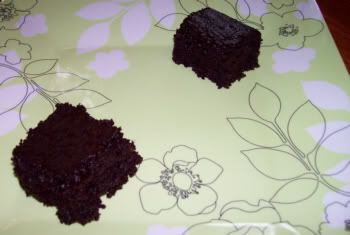
The end result? A very moist, very chocolate brownie with a spongey texture. My "public's" reactions have been varied. I'm the only one that thinks they're really chocolatey. My mom and Dave thinks they're more cake-like than brownie like. My dad will eat pretty much any brownie, so yay for him getting some soy protein. :) Of the three coworkers who tried them... one says too much like dark chocolate (she doesn't like dark chocolate), next said they were good, and the third loved it, giving it an A+. I think he just likes the fact that they're lower in calories, but hey, I gave him half the batch after he declared them delicious. :)

It was really hard to get a decent picture of these. It was cloudy on Sunday when I took the pictures, so natural light was not my friend then. Scarily enough, this picture is the best of the ones that were taken. lol


Ingredients:
2¼ cups natural cane sugar
1½ cups all-purpose flour
1½ cups unsweetened cocoa powder
1½ tsp. baking powder
1½ tsp. baking soda
1/8 tsp. salt
1 cup unsweetened applesauce
1 cup soft tofu
3/4 cup chocolate soymilk
2 tsp. vanilla extract

Directions:
Preheat oven to 350F. Coat a 9x13-inch baking dish with cooking spray.

Combine sugar, flour, cocoa powder, baking powder, baking soda, and salt in large bowl.

Combine applesauce, tofu, soymilk, and vanilla in food processor, and process until well blended. Add tofu mixture to dry ingredients, and mix well. Scrape batter into prepared pan.

Bake at 350F for 45 minutes, or until batter is set and top is dry. Cool in pan; cut into bars and serve.

7.22.2009

Pizookie!

Another post that's been in the making for, well, a few days. :)

Me and Amelia's Harry Potter/Rent vacation was quite awesome. Lots of fun and a whole lot of laughs. 'Rent' just blew me away, and we were able to get autographs after the show (including those of Anthony Rapp and Adam Pascal - woohoo!!). We also got to know Boston Commons extremely well. To put it lightly. ;) Seriously, it was so good to hang out with a friend that can finish your sentences. Huzzah! Now the next thing to look forward to is my trip to CA in October. Where we're hoping to see 'Rent' in San Francisco. :D

Onto the baked goods. I knew that when Amelia was out here that I wanted to make Pizookies. Pizookies are from BJ's Brewhouse & Restaurant, and they're a personal-size deep dish cookie, fresh from the oven and topped with vanilla ice cream. The cookies come in chocolate chip, macadamia, peanut butter, oatmeal raisin, and an oreo-style. They are DELICIOUS. Really, you should go get one. Or if you're on the east coast and the closest one is in Ohio, you should make this recipe. :)

For the cookie part, I just used the basic Toll House cookie recipe and halved it. The bake time varies a bit depending on how thick the dough is inside the ramekin. The two smaller ones that we made were fine at 25 minutes, but the larger, about-an-inch-thick should have stayed in probably for another 8-10 minutes. Either way, they were still good. Even the one reheated in the microwave the next day.


Ingredients:
1-1/8 cups flour
½ tsp. baking soda
½ tsp. salt
½ cup butter, softened
1/3 cup sugar
1/3 cup brown sugar
½ tsp. vanilla
1 egg
1 cup chocolate chips (white, semi-sweet, milk - makes no difference)

Directions:
Preheat oven to 375F.

Beat butter, sugar, brown sugar, and vanilla until light and fluffy. Add egg. Whisk together flour, baking soda, and salt; gradually add to butter mixture. Stir in chips.

Fill four ramekins with about half an inch of dough on the bottom. (If making a thicker cookie, do adjust the baking time.) Place on a cookie sheet. Bake at 375F for about 18 minutes. Remove from oven and place ramekins on potholders or napkins. Top each cookie with ice cream and ENJOY.

7.12.2009

Baklava Bites

Let's see... what have I done since the last post?

-Cleaned. Really, I did. Even found stuff that I completely forgot about.
-Read. 2½ books.
-Made brownies for my dad.

Umm... I'm drawing a blank. But I'm sure I must've done something fun and creative and productive somewhere along the way. :D

Hmm.

The first time I ever tried Baklava was in Epcot's Moroccan pavilion, back in 2004. I fell in love with it. The spices, the sticky-gooey-ness of the honey, everything. I've had some elsewhere since then, but surprisingly enough, Epcot's remains the best. (Then again, the places I had it weren't exactly um... let's just say there was a bit of a culture clash, to put it nicely)

I think I have to backpedal a bit more. The other night, I dreamed of puff pastry. I don't have much experience with it, yet I bought two sheets the next day at the store. Now it's Friday night and I'm wondering what to do with it.

In walks a favorite blog - Baking Bites... well, if a blog could walk... never mind. That's neither here nor there. After some deliberation, I went out and bought honey.

I followed the directions nearly to a T. I just minused the walnuts since my dad can't eat them. But the results were still delicious. And, oh, how yummy it made the house smell! I had a hard time putting them together as Nicole did, so I made a ravioli-type shape with them. Which leads me to all kinds of ideas of what I can do with puff pastry and ravioli shapes. :)

Oh, and my favorite part? The bite-sized-ness. It was quite easy to eat, well, five of them before dinner. ;)


Ingredients:
16-oz puff pastry, room temperature
1 cup finely chopped walnuts
¼ cup sugar
¼ tsp. each ground cinnamon, cloves, cardamom and allspice
Pinch salt
¼ cup honey
2 Tbsp. butter, melted

Directions:
Preheat oven to 375F. Line a baking sheet with parchment paper.

In a small bowl stir together walnuts, sugar, spices and salt until well mixed. Add in melted butter and honey and stir well. Set aside.

Roll out the puff pastry on a lightly floured surface. If you are dealing with two sheets, aim to get two 8×10-inch rectangles about 1/8-inch thick, or slightly thicker. If you are dealing with just one sheet, simply roll it out into a large rectangle, or a 16×10-inch, if you can get it.

Use a sharp knife or a pizza cutter to cut pastry into approx 2×4-inch strips (cut pastry in half, or quarters when dealing with a large sheet, then divide into strips.). Place 1 tbsp filling on one end of each strip, then fold the pastry over to make a pocket. Press pastry together to seal. If necessary, dampen fingers with water before sealing edges. Place the bites on the prepared baking sheet.

Bake at 375F for about 20 minutes, until pastries are puffed and golden. Let cool for at least 10 minutes before serving. Pastries can be served fresh from the oven or at room temperature.

7.08.2009

Corn Muffins

Well, here we are, the eighth of July. My friend Amelia comes out here from CA in exactly a week from now. The weather is finally starting to act a bit more summery. (Hey, look, it's real sunshine! And, oh my goodness, blue skies!) I'm supposed to be cleaning, and, well, I'm sitting in front of the computer while reading a book. Again. I really have made some progress, though. It just doesn't look like it. :)

While wandering in Stop & Shop's "Natural Food" section, I came across Bob's Red Mill's yellow cornmeal. Obviously it was a sign of the baking gods that I should finally attempt to make corn muffins for the very first time.

I came into liking corn muffins and cornbread rather late in life. I believe it was at Dave's Aunty Vicky's where I first truly enjoyed cornbread. And since then, I've been a believer. ;)

The recipe I went with is from Gale Gand, found over at the Food Network website. It is super-duper simple, with everything done right in one bowl. Upon tasting, I did the celebratory "I made corn muffins for the first time and they didn't suck" dance. :) I think I'd like them to be a little bit sweeter, but other than that, I'm really pleased in how they came out.

Now, maybe I should work on a bit more cleaning. Maybe.


Ingredients:
1 cup all-purpose flour
½ cup yellow cornmeal
¼ cup sugar
1½ tsp. baking powder
¼ tsp. salt
2 eggs
¼ cup milk
8 Tbsp. unsalted butter, melted

Directions:
Preheat oven to 350F. Line 8-12 muffin cups with paper liners.

In a medium bowl, sift the dry ingredients together. In a large bowl, whisk the eggs and milk together. Add 1/3 of the dry ingredients to the egg mixture, then 1/3 of the melted butter, and stir gently just until incorporated. Repeat with the remaining dry ingredients and melted butter, being careful not to over-mix; there may be a little flour not mixed in at the end. Use an ice-cream scoop or large spoon to fill the muffin cups half full.

Bake at 350F for about 15 minutes, or until risen, light golden brown, and firm to the touch. Let cool at least 15 minutes in the pan.

7.02.2009

The Unphotographables: Strawberry Cream Bars

See, I've been bad about posting again. So now I'm making myself do this now, because I can't have breakfast until I finally get my butt in gear and post about these. :)

Last Saturday, I really had no clue what to make. But I knew it would be fruity. It was the first really good day out of the entire month of June. (Yeah, June missed the memo that traditionally the weather should be sunny and a bit warmer. We had rain and grey for like 24 days of the month.) Saturday was beautiful. I even wore shorts and successfully blinded some people, I'm sure. I take after the English/Irish side of my family and am very fair-skinned. Besides, skin cancer is ugly.

Anyways, beautiful day. I always wear sunscreen on my face, else I get a bajillion freckles. I wore a tank top for the first time all year. This is one of those moments where if you had just a little inkling of what the afternoon had in store, it would've been fabulous. You can see where this is going, right? Dave and I went to play miniature golf. He won, as usual. But this time there was a consolation prize of sorts: the first sunburn of the year. Across the shoulds, back of the neck, top of the back. But good news - the legs have kept their traditional white color. :)

(Maybe I shouldn't post before breakfast. Obviously more chatty.)

I wanted something with minimal oven time and nothing was appealing. Somewhere in my head, a lightbulb flashed on. A bar, reminiscent of my Strawberry Kiwi Cream Tart. But only with strawberries and no vanilla pudding. Thus, this recipe was born.

I've found in the past that Martha Stewart's graham cracker crust doesn't always hold well together. So I upped the butter to 4 tablespoons, versus her 3. Yet this time, it was like sand. Thus, no picture because every time I try cut a nice slice out, it's a big mess.

But the taste? Vanilla cream cheese with strawberry slices? Oh, yum. I'm almost kinda glad they don't travel well. That means more for me. Just go to the fridge with a spoon and I'm a happy girl. Maybe I should have that for breakfast. :)

Ingredients:
(your favorite graham cracker crust for an 8-inch baking pan)

8 oz. cream cheese, softened
¼ cup sugar
2 tsp. vanilla

1 cup strawberry slices

Directions:
Once graham cracker crust of your choice is cooled and ready to be filled....

Beat cream cheese, sugar, and vanilla until smooth. Spread over cooled crust. Top with strawberry slices. Refrigerate for a few hours before serving.